FolkArt studio
How to choose FolkArt paint for your project
A practical guide to formulas, surfaces, finishes, palettes and the steps that make a painted project easier to plan.
The most useful first question is not which color to buy. It is what you want to paint. A small canvas, a glass vase and a plastic planter can all be blue, but they do not necessarily need the same formula, preparation or care. Decide what the object is, where it will live and how you want its surface to look. Those three decisions narrow the paint choice quickly.
Our FolkArt range gives you several ways to approach a project: matte acrylic color, a satin Multi-Surface finish, ultra-matte chalk paint, reflective metallics, glitter, glass enamel and textured effects. This guide helps you separate those choices without turning a simple creative idea into an equipment checklist. Start with the section closest to your project, then use the product details to confirm the exact selection.
1. Give the project a clear job.
Picture the finished piece in use. Will it hang on a wall, sit on a shelf, hold a plant or be handled every day? Will it stay indoors or spend time on a porch? A decorative object that is touched occasionally has different demands from a frequently handled container. Write down the material and the intended setting before comparing bottles.
Next, decide what needs to change. You might want a new base color, a small repeated pattern, a metallic edge or a visibly raised texture. A restrained change often needs fewer colors and less paint than a full transformation. Keeping the purpose specific also helps you avoid buying a large kit when a single effect is the real goal.
Look at the object’s existing condition. A sound, clean surface is a more useful starting point than a coat of paint over dust, grease or peeling material. If the existing coating is unknown, establish what it is before attempting abrasive preparation. The right process depends on the object, and a decorative-paint project should not begin by guessing about an old finish.
Finally, choose a manageable first attempt. A small frame, sample board or simple pot gives you room to learn the brushstroke and see the dried color. Keep larger or more valuable pieces for after the sample has answered your questions. You can use the same palette later without making the first project carry every idea at once.
2. Choose the finish before the palette.
A finish changes how light moves across an object. Flat matte color feels different from a soft satin sheen, while glitter and metallic paint create another kind of reflection. Texture adds a physical difference as well: a raised acrylic mark can make its own shadow. Compare those effects before choosing the exact shade.
| Formula | What it adds | A useful starting point |
|---|---|---|
| Matte acrylic | Flat color for compatible craft surfaces | Canvas, painted signs and everyday craft projects |
| Multi-Surface | A satin finish across several supported materials | Coordinated decorative objects |
| Home Décor Chalk | An ultra-matte finish that can be distressed | Furniture accents, frames and decorative refreshes |
| Metallic | Reflective color | Edges, patterns and decorative accents |
| Glitterific | Glitter particles in a paint base | Sparkling layers and seasonal details |
| Enamel | A gloss finish for glass and ceramic projects | Decorative motifs with a planned cure process |
| Super Thick | Raised, opaque matte marks | Dimensional craft textures |
| Terra Cotta | A finer, earthy matte texture | Decorative surfaces with a clay-like appearance |
Matte acrylic is an approachable place to begin when you want the color and pattern to do the work. Our eighteen-color set offers a broad palette for wood, paper, canvas and other compatible craft materials. A set is useful when you expect to try several projects or mix colors, while a focused palette can simplify one specific design.
Multi-Surface offers a satin alternative. Think of a few objects made from different supported materials that need to feel connected: a painted wooden accent, a decorative pot and a glass detail. The shared palette can connect them, but each surface still needs its own preparation and curing instructions. The words “multi-surface” do not eliminate those differences.
Home Décor Chalk is a different choice again. Its ultra-matte finish suits decorative refreshes and can be layered or distressed. It is not chalkboard paint. If you want a surface to write on with chalk, an ultra-matte decorative coating does not provide that function simply because its name includes the word chalk.
Metallic and glitter finishes are worth comparing side by side. Metallic paint gives a reflective colored surface; glitter introduces visible particles and a more varied sparkle. Our Best of Golds set makes this distinction particularly clear because it combines five formulas rather than five shades of one paint. Treat each formula as its own material with its own instructions.
For texture, decide how pronounced you want the result to be. Super Thick is heavy-bodied and intended for dimensional effects, while Terra Cotta creates a finer textured matte appearance. A clay-like finish on a glass vase remains a decorative coating on glass. It does not turn the object into a porous clay vessel or change how it should hold water.
3. Match the formula to the material.
Check the selected product’s supported surfaces instead of relying on a general family name. Our acrylic set, Multi-Surface set and specialty paints have different uses. The product page is the place to confirm the chosen pack, and the current bottle instructions are the reference for actual preparation, application and curing.
On wood, think about both the material and any existing finish. Bare craft wood, a coated frame and a piece with a waxed surface are not identical starting points. Remove dirt and loose material using a suitable process, then test the paint on a hidden area or a matching offcut. If you plan to apply wax or another finish, include it in that sample.
Glass and ceramic projects need particular attention to the parts that will be painted. Keep decorative paint away from drinking rims and food-contact surfaces unless the product expressly supports that use. Our Enamel set is intended for glass and ceramic painting, but a durable finished project still depends on the specified cure. Looking dry is not the same as being ready to wash.
Read the cure instructions before you begin. If an oven-curing method is specified, confirm that the object itself is suitable for the process. Use the current paint package’s directions rather than transferring a temperature or time from another formula.
Plastic needs its own check because different plastics behave differently. The Paint for Plastic kit identifies suitable examples and materials that are not recommended. Flexible items such as shower curtains, rain boots, grocery bags and bubble wrap are outside its recommended examples. Test the exact object, and leave enough time for the stated thirty-day full cure.
Outdoor placement is another separate choice. A formula described for indoor use should not become an outdoor paint simply because it is applied to a garden object. Glitterific Pastel Purple is an indoor selection; Golden Treasure Pop supports indoor and outdoor decorative projects. Check the individual product rather than extending a claim across the entire range.
Canvas and paper also deserve a sample. The support must suit the amount and weight of paint you intend to apply. A thin painted pattern and a raised textured design ask different things of the surface. Test the material and technique together so the sample answers the question you will actually face on the finished piece.
4. Build a palette you will use.
Begin with one color that belongs in the finished setting. It might come from a fabric, a photograph, a room accent or the object itself. Add a lighter or darker companion and one small accent if the design needs it. A short palette is easier to repeat across several pieces and makes it easier to see what each color contributes.
Paint a physical swatch before committing to a close match. Screen brightness, surrounding colors and the lighting in a room can all affect how a color appears. Compare the dried sample where the piece will be displayed. Turn a metallic or textured sample as you look at it, because its appearance can change with the angle of the light.
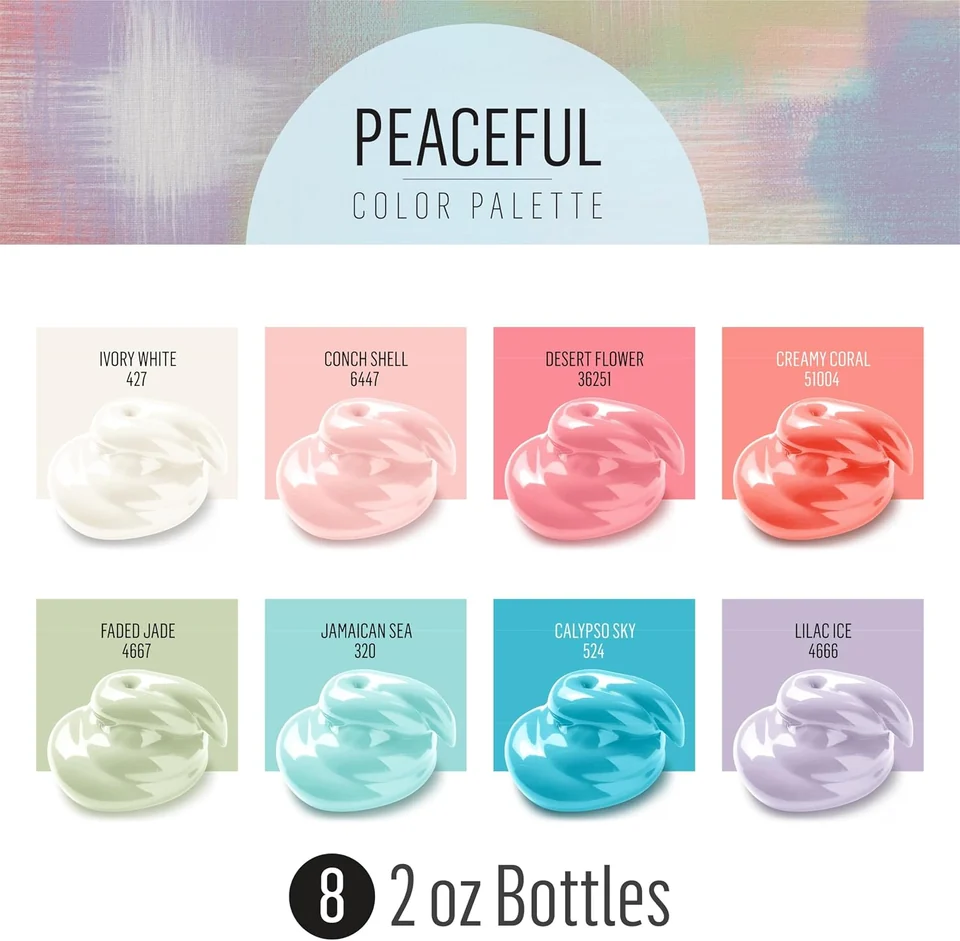
Sets are useful when they solve a real palette problem. The eighteen-color Acrylic Paint Set gives you a broad range, while the Mindful Matte Peaceful Colors kit offers a more focused group of soft shades and includes brushes. Neither is automatically the right choice for every project. Compare the bottle count, finish and included tools rather than judging only by the number of pieces on the package.
A “piece” can mean a paint bottle or a brush. For example, the fourteen-piece Mindful Matte kit contains eight paints and six brushes. The Jewel Tone kit contains twelve paints and three brushes. Reading that breakdown prevents the common mistake of comparing kit counts as though they were all color counts.
Some assortments and packaging can vary. When a specific color is essential, confirm the exact contents in the purchase tab. Gallery photographs may show several project colors to explain a formula; that does not mean every color pictured comes in the selected pack. Keep the selected option and the application example separate in your planning.
5. Set up for the marks you want to make.
Choose tools around the size and shape of the area. A flat brush can cover a broad panel or make a defined edge. A smaller brush gives you more control around a narrow detail. Use a test surface to learn how much paint the brush holds and how the mark changes when you alter its angle or pressure.
If a kit includes brushes, check their sizes before adding more. The Paint for Plastic and Jewel Tone kits include half-inch, three-quarter-inch and one-inch flat brushes. The Mindful Matte kit adds chip brushes to its flat brushes. These are practical differences when you want to explore broad strokes, base coating or a looser surface effect.
For Super Thick, the wide-mouth jar makes it easier to scoop paint onto a palette or the project. Use a suitable tool to explore ridges, short strokes and repeated shapes. Start with a modest amount while you learn the movement. The goal of the sample is to see what the material and tool do together, not to make a finished artwork immediately.
Prepare the work area before opening the paint. Protect the surface underneath, make space to turn the object and set out what you need for cleanup. Keep tools intended for decorative painting separate from food preparation. A faux-icing technique is a craft effect, not permission to use paint on something edible.
Consider where the piece will rest while drying. A project can be awkward to move once every convenient gripping point is wet. Plan an unpainted support area or a suitable stand, and arrange the work so you do not need to reach across fresh paint to access another side.
6. Make a sample that answers a question.
A useful sample is specific. Test the actual material, the intended formula and the finishing step you plan to use. If you are comparing colors, keep the application method consistent. If you are comparing brushstrokes, keep the color the same. Changing one thing at a time makes the result easier to understand.
For glitter, compare the effect over a white base and a base close to the glitter color. The background remains part of the finished impression. Let the base coat dry before adding the effect layer, then examine the result from both near and far. A finish that looks busy at close range may read as a gentle sparkle across a room.
For metallic paint, look at the sample under the light the object will actually receive. The contrast between a metallic detail and a matte background can be useful, but only if the two formulas and surfaces are compatible. Follow the labels rather than assuming a combination works because the colors look good together.
For chalk paint and wax, judge the completed sample after the finishing process. The wax and the amount of buffing can affect the sheen. If the finish looks right only before the protective step, you have not yet tested the result you intend to use. Keep the sample beside the project while you work.
Make a short note of the formula, color and method on the back of the sample or in a project notebook. That helps when you return to the piece later, want to repeat it or need to remember which finish went on top. A simple record is more reliable than trying to identify a dried color from memory.
7. Work in manageable layers.
Organize the design into a few clear stages. Establish the main color, add larger shapes, then move to fine details or a decorative effect. This order gives each layer a job and helps you avoid repeatedly covering a detail you added too early. Let the paint’s instructions guide drying time between applications.
Use controlled amounts of paint while learning a formula. A heavy load can obscure an edge or collect in a decorative recess. That may be useful for a deliberately raised effect, but it is less useful when you want a clean, level coat. Choose the amount according to the result rather than treating thicker application as automatically better.
Turn the object and check it from different viewpoints as you work. A front-facing photograph can hide a missed edge, a crowded pattern or a thick accumulation around a handle. Pause before the finishing stage and look at the whole piece. Small corrections are easier when you can still identify exactly what needs attention.
Texture needs the same deliberate approach. With Super Thick, plan where the raised marks will sit and how they repeat. The spaces between marks can be part of the design. Avoid filling every area just because the material allows dimension; give the strongest shape room to be seen.
Clean brushes and tools while the paint is still wet, using the method stated on the product. Do not leave cleanup until every bottle is put away and the acrylic has dried into the brush. Close containers between working stages and keep the label with the material so its instructions remain available.
8. Finish the piece, then let it be ready.
Finishing is a separate decision from painting. The right wax, sealer or cure process depends on the formula and the way the object will be used. Do not add an unfamiliar topcoat just to make a project feel complete. Check compatibility, test it on the sample and follow both products’ instructions.
For the selected Home Décor Clear Wax, use a small amount and work it into the details. Let it dry for one to two hours, then buff with a soft cloth. More buffing increases the sheen. Keep the waxed piece free from moisture and heavy use for seven days, and follow the label’s maintenance guidance over time.
For glass enamel, complete the prescribed curing process before washing. For Paint for Plastic, plan around the stated thirty-day full cure rather than the shorter wait between coats. A project can be attractive enough to display before it is ready for every kind of handling, so resist using appearance alone as the test.
Put the finished object in the setting the formula supports. Keep indoor-only glitter projects indoors, and follow the outdoor paint’s cure instructions before weather exposure. A decorative coating does not change the underlying object’s structural, heat or food-contact suitability.
Keep the next project simple.
When a piece is finished, notice what made the process easier: a short palette, a useful sample, a brush that fit the shape or enough time between stages. Carry that choice into the next project. You do not need to make every piece more complicated to keep learning.
If you are ready to choose a paint, use our formula finder to connect the surface with a paint family. Browse paint sets when a coordinated palette will help, or explore all selected FolkArt paints for a specific finish. Confirm the selected color, size and pack contents before continuing to purchase.
For a formula question that the current label does not answer, use the published product-support route on our contact page. Keep the product name and a clear description of the surface nearby. The more specific the project question, the easier it is to find the right instruction.